
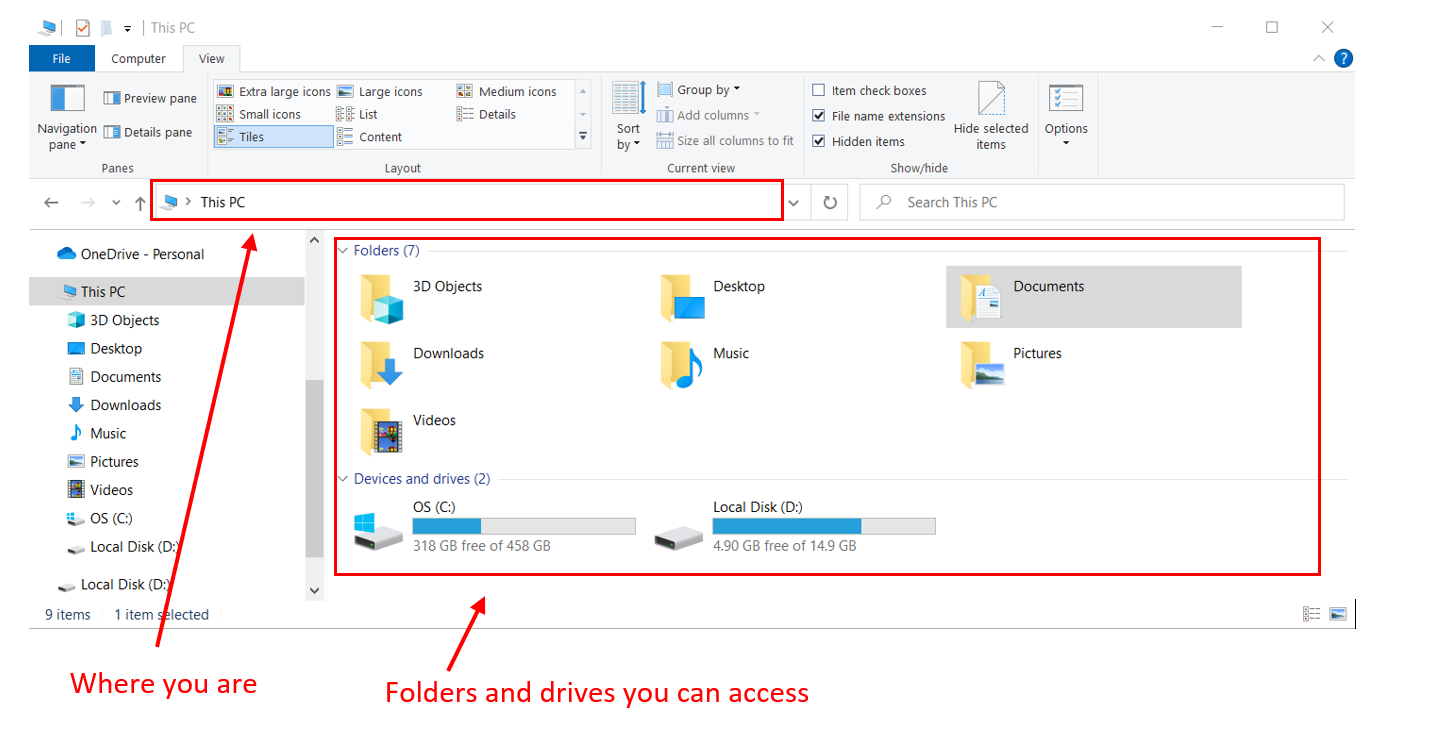
Using ACRES: The Basics of a Linux Command Line

If it's your first time logging in to ACRES, you may be left staring at a flashing green cursor in a black terminal, without the slightest idea of what to do next.

If that's you, you've come to the right place. Read on, and you'll be up and running in no time!
To get started as quickly as possible, try the Crash Course.
For more detailed explanations, jump to the Full Tutorial.
Throughout the tutorial, places in which you need to substitute your own specifics are given in pointy brackets "<>".
- 1Crash Course
- 2Full Tutorial
- 2.1Background
- 2.2Navigating the System
- 2.3Managing Files
- 2.4Saving Command Output (Redirects)
- 2.5Wildcards
- 2.6Command Help Info
- 2.7Editing Text Files
- 2.7.1Normal Mode
- 2.7.2Insert Mode
- 2.7.3Command Mode (and how to save and quit!)
- 2.7.4Vim References
- 2.8Shell Scripting (and the chmod command)
- 2.8.1Executing the script
- 2.8.2Variables
- 2.8.3Command line arguments
- 2.8.4Programming functionality
- 2.9Cancelling / Aborting a Command
- 3Other Useful Commands
- 4For Further Reading on ACRES
- 5Related articles
Crash Course
Once you log in, you will be in (i.e. the working directory is...) your home directory on ACRES (aka. "~").


See what is here, in the working directory, with "ls" (lower-case L S):


Nothing is printed, because there are no files or folders in your home directory yet.
Now make a directory, and see that it is here:

Run pwd (print working directory) to find out where exactly "here" is in the file structure.
Use cd to go into another directory:
cd


ls gave nothing: there is nothing in "somedirectory".
Use "cd .." to go up one level (back to ~).
Copy files to ACRES from your computer (and via-versa) using the instructions here: How to Transfer Files between Acres and Your Local Computers
You can copy or move (like cut and paste) files within the directories of ACRES using the following commands:
cp <copy directory / filename>
mv <new directory / filename>
Use TAB to auto-complete possible file names and commands while typing. If multiple possibilities exist, see them by tapping TAB twice.
To see help info on any command, try:
man
or
Use vim to view or edit files on ACRES.
vim <file to edit / new file>
To edit ("insert"), press "i" on the keyboard.
To stop editing, press ESC.
To save: ":w"
To quit: ":q"
Full Tutorial
Background
High Performance Computing (HPC) clusters often have a Linux operating system, to reduce overhead and improve efficiency versus a Windows OS. ACRES is no exception, featuring a CentOS 7 linux distribution. In these situations, users often do not have the luxury of a Graphical User Interface (GUI) for interacting with the machine, but must use a Linux command line (aka. terminal, shell), to perform tasks and run jobs.
Navigating the System
At it's most basic level, one may think of the command line as a sort of file explorer. In a Windows desktop, for example, you'll often navigate the computer's file system using one of these:

On a linux command line, you are also running commands within a certain directory (aka. folder). The name of the folder you are in (aka. the "working directory") is given in the rightmost part of the bracket before the command prompt. When you first log in to ACRES, this will be your home directory, which has a special nickname: "~". The text before the command prompt gives you additional information to help you keep your bearings, such as the name of the computer you are logged in to (the "host") and your username that you are logged in with.


To see the full path to your working directory (and not just the topmost folder you are in) type the command: "pwd" (short for "print working directory"), and press enter. You will likely see "/mnt/home/". This is the location of your home directory relative to the entire file system. Notice that your home directory is a folder of the same name as your user account, located in /mnt/home/. Again, the "~" that you see at the command prompt is just a nickname for your home directory. On any Linux system, a single slash with nothing preceeding it, "/", represents the "root" directory which is the directory that contains all other directories on the system. This is similar to "C:\ "on a windows system, for example, if your computer only has a C drive. This is why the full path to your home directory is "/mnt/home/".
Notice also that Linux operating systems use a forward-slash "/" between directories, whereas Windows uses a back-slash, "\".
To see the files and directories that are in your working directory, we can run a command that will print the contents of the working directory to the screen. This is the "ls" command (that's a lower-case L S , short for "list"). Run "ls" now. You will probably see nothing and find yourself back at the command prompt. This is because you don't have anything in your home directory yet.

Let's make another directory in there with the "mkdir" command. Type "makdir somedirectoryname". This will create a directory in your working directory (which is your home directory, at the moment) with the name "somedirectory". Now run "ls" again, and you will see it in your working directory:

Now lets change the working directory so that we are in the "somedirectory" directory. Run the command "cd somedirectory". The command "cd" is short for "change directory", and it lets you move between directories as you would if you double-clicked on a folder in the Wondows File Explorer. You will see that the working directory given the the left of the command prompt has now changed to "somedirectory", and if you run "pwd", you can see that your working directory is now "somedirectory", which is inside "/mnt/home/" directory.
If you run "ls", you will now see nothing, because the "somedirectoryname" directory is empty.

To go back to the "~" or home directory, you can run the command "cd ..". The double-dot, "..", is a nickname that refers to the directory that in which the current working directory resides. In this case, that is the home directory, since we made the "somedirectoryname" directory inside the home directory. In essence, you can use the "cd .." to go up one level in the directory structure. Similarly, a single "." represents the current working directory, so "cd ." does nothing, and "cd ./.." goes up one directory from the current directory, etc. This use of "." is essentially unnecessary here, but there are sometimes reasons to explicitly write the current directory, and you will often encounter it written explicitly anyway.

Just for practice, move up one directory again: "cd ..", run "pwd", and run "ls". After the "pwd" command, you will see you are in the "/mnt/home" directory.


After running the "ls" command you will see a list of the home directories of all the other users on the system–all directories that are contained in "/mnt/home". You will not be able to "cd" into any other user's home directory, and other users are not able to "cd" into yours. This is controlled by the linux concept of file permissions, which you can read more about here: https://linuxhandbook.com/linux-file-permissions/. Run "cd ", to go back to your home directory. You can also run the "cd" command by itself, with no arguments, to go back to your home directory from anywhere on the system.
Managing Files
If you are going to run jobs on ACRES, you will obviously need to copy your files to ACRES and manage them there. Let us practice doing this with a sample file, which you can download here: sample_file.txt
At this point, take a pause from this tutorial and copy the file to your "somedirectory" folder on ACRES following the instructions on this other How-To page: How to Transfer Files between Acres and Your Local Computers
Now cd to "somedirectory" and run "ls". You should see:


Now make a new directory here, using "mkdir sample_dir", and run ls.


You'll notice that both the new directory and the file are shown, but the directory is in blue, and the file is in gray. These are the default colors that help you distinguish between directories and files.
Moving and Renaming Files
Now let's use the "mv" command to move the file (equivalent of cut-and-paste) into "sample_dir". The syntax of the "mv" command is:
mv
So we run:


We see that the file is no longer here in the "somedirectory" folder, as expected. Let's go into the sample_dir folder and see that it is there:


Note that you can also change the name of a file with the "mv" command. If the second argument you provide is not the name of a directory, it will change the name of the file.
mv


File and Directory Names With Spaces
To manage files or directories that have spaces in their names, you need to enclose the name is quotes "". Alternatively, you can type a back-slash before each space, which informs the computer that the next character (space) is literally the character that it is, and not meant to be interpreted as part of the command syntax (since space is used as a separator between arguments). This backslash method is called a "escaping", and the backslash itself is the "escape character" that "escapes" the space. These two methods are demonstrated below by renaming the file to a name with spaces, and then renaming it back.


Copying Files (and learning Auto-Complete!)
Copying files is very similar to moving them, except we use the "cp" command.
cp <file to copy> <directory to copy to>
The "sample_file.txt" may be coppied to the directory above ("somedirectory") via the following, and if we cd up one directory we can see that it is there.


And if we cd back into "sample_dir", we can see that it is still there as well:


Now let's copy the file again, but this time right here in "sample_dir", giving the copy a new name. This is much like renaming the file with "mv":
cp <file to copy> <new file name>
But WAIT. As you type this command type it partially like so...
cp sampl
Now press TAB on the keyboard... You'll see that the name of the file "sample_file.txt" is completed for you!
cp sample_file.txt
When you press TAB the computer searches for relevant files that match the name you started typing. Since this directory only contains one file, it doesn't have to guess. Your may finish the command by typing the copy's name manually, or if we want to give the copy a similar name we can use autocomplete for the second argument, and edit like so:
cp sample_file.txt sam
* TAB *
cp sample_file.txt sample_file.txt
Now tap over to the left with the left arrow key to edit the copy's name and insert a "2":
cp sample_file.txt sample_file2.txt
Now press enter:


Now let's say we wanted to copy "sample_again2.txt" to the directory above, as we did with "sample_again.txt" earlier. Try using TAB for auto-complete, and you'll notice that it stops at: "cp sample_again"


This is because, of course, we have two files that begin with "sample_again", but the computer doesn't know which one you want to select. You can press TAB twice (double-tap it) now and it will show relevant options that match the text you have so far:


(In this case it looks just like the output from "ls", but if there were other files in there, it would only show the ones that start with "sample_again").
Now press "2" and tap TAB again to finish the name of the file to copy. Then add " .." or "./.." for the directory to copy to. Press enter. We can go up one directory and use ls to see that the file is there.


Copying Whole Directories
If you ever want to copy a whole directory with the cp command, you must use the "-r" option, like so:
cp -r <directory to copy> <directory to copy to>
Deleting files
To delete a file (or multiple files) use the "rm" command (short for "remove"):
rm ...
Deleting files with "rm" deletes the files permanently. You cannot recover them from a recycle bin, like you can after deleting something in a Windows OS.
To delete a whole directory, and everything it contains, use
rm -r
The "-r" represents "recursive", meaning the command will operate on all files and subdirectories, and files within subdirectories, etc. of the specified folder. This is similar to "cp -r", when copying directories. To delete "sample_again2.txt", run "rm sample_again2.txt", like so:


To practice copying and deleting directories, let us copy "sample_dir", using "cp -r" and delete the copy:


Printing the contents of a file
You can see the contents of a file by using the "cat" command (short for "concatenate", since it can output the contents of multiple files together):
cat
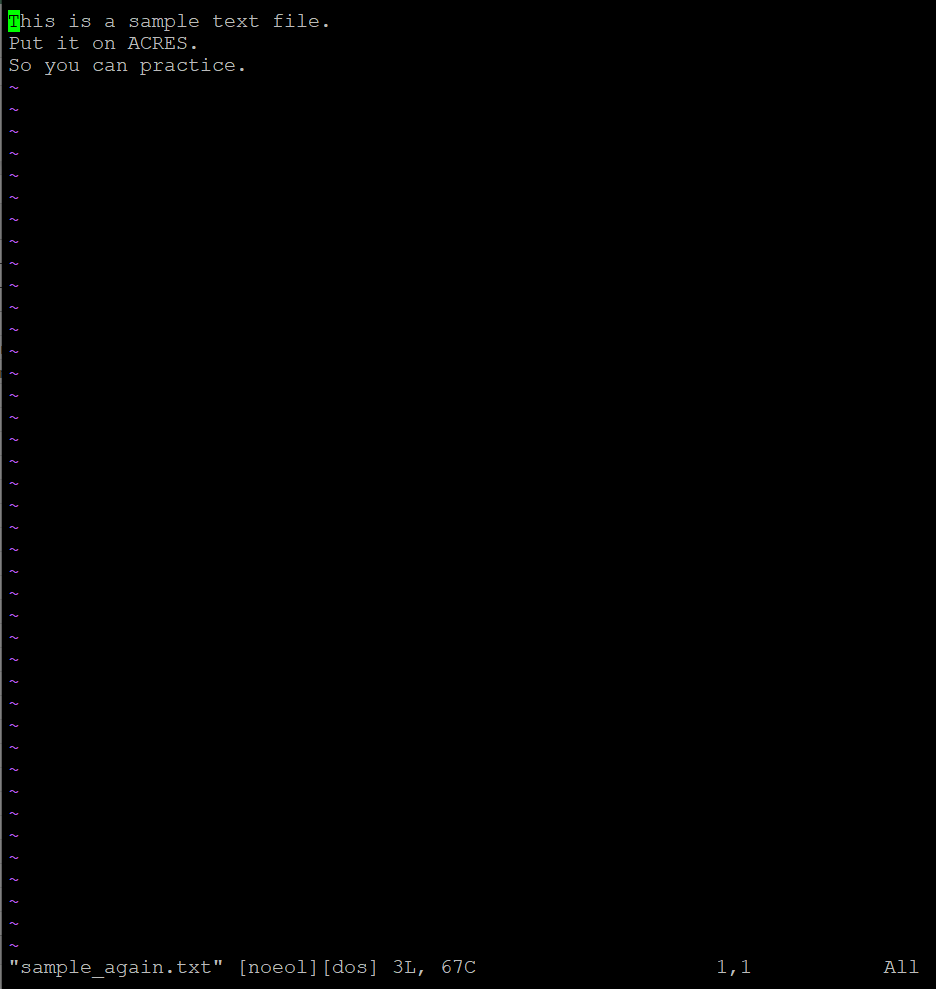
Try this with one of the sample files:


So the text contained in the sample file is:
This is a sample text file.
Put it on ACRES.
Saving Command Output (Redirects)
You'll have noticed a pattern by now where many commands (like ls and cat) produce text output to the screen. Instead of viewing this text on the screen, you can save it in a file, using what are know as redirects. If you'll ever see them, redirects are things that look like ">" or "|" or "2>&1" at the end of a command. You can learn more about them here:
https://linuxhandbook.com/redirection-linux/
Wildcards
The asterisk, "*" is a very useful symbol that can be used as a "wildcard" to represent multiple files (or whatever else), whose names match a pattern. You can learn more about that here: https://www.educba.com/linux-wildcards/
Command Help Info
You can access help information for almost any common command by using "man


This will usually provide a brief description of the command and a list of any command line options you may use to modify it's behavior.
Editing Text Files
Suppose you don't want to view the contents of a text file only, but actually edit it. There are a number of programs available for editing text files directly from the terminal, but two common ones which are installed on ACRES are:
In this tutorial, we will be covering some of the most useful functions of vim. To open a file with vim run the command:
vim
If the "" does not exist, vim will create a new file of that name.
To open one of our example files, run:


Now you should be seeing this:

Normal Mode
In vim there are several "modes" in which keyboard functions change, depending on what mode you are in. The first mode you are in, when you open a file, is "normal" mode. From here you may navigate the document and access other modes.Below are some useful keyboard shortcuts you may use in normal mode:
| Keyboard Shortcut | Function |
|---|---|
| Keyboard Shortcut | Function |
| --- | --- |
| G | jump to the end of the file |
| g + g | jump to the beginning of the file |
| ctrl + n | next line |
| ctrl + p | previous line |
| ctrl + f | page down ("forward") |
| ctrl + b | page up ("back") |
| i | enter "insert" mode |
| : | enter "command" mode |
You can't edit the file or insert text while in "normal" mode! To insert text, you need to use insert mode, which will be discussed next.
You can return to normal mode from other modes by pressing the escape key on the keyboard.
Insert Mode
To enter insert mode, press the letter "i" on the keyboard. Now you will notice it says "Insert" at the bottom of the screen to tell you that you are in "insert" mode.


Now you can edit the document, you may move the cursor with the arrow keys, and insert text wherever you'd like. To get back to "normal" mode, press escape on the keyboard.
Command Mode (and how to save and quit!)
To enter command mode type a colon on the keyboard ":" (shift + semicolon key). Now, you may type commands, as you see at the bottom of the screen:


You can use these commands to save the file and/or quit vim:
| Command | Function |
|---|---|
| Command | Function |
| --- | --- |
| :w | save file |
| :q | quit vim |
| :wq | save and quit |
| :q! | quit without saving |
Vim References
There are many other commands and keyboard shortcuts. Check out these references to see more!
Vimdiff
Also check out vimdiff for comparing differences between files! Syntax:
vimdiff <file 1> <file 2>
You need to run ":q" twice to close both files and quit vimdiff.
Shell Scripting (and the chmod command)
Suppose you want to automate some task that can be accomplished with a series of command-line (aka. shell) commands. You can write a script file for it so that you can execute all of those commands at once and as many times you need!
Scripts for Running Jobs
This article covers the basics of linux shell scripting in general, but you'll also need to know how to write a a special kind of shell script for running jobs on ACRES, called a SLURM job script. You can read more about that here: How to run your codes on Acres
Open a new file with vim, that we will call "myscript.sh". (scripts usually have the ".sh" extension, representing "shell")


You should now see a blank file in vim. Press "i" to enter insert mode, and type the following line at the top of the file:

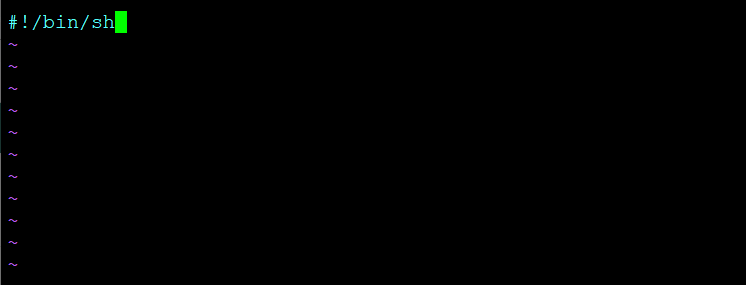
This is called a "shebang" line, and it tells the computer how to interpret the commands in this file when you try to execute the file as a script. By using "sh", you are using a generic linux command interpreter.
You may now add commands on the lines below–anything that you could run on the command line, you can run here in the script, using the same syntax.
Executing the script
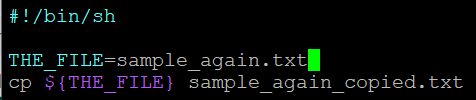
Let's add a simple command to the script for testing purposes:


This simply copies the file "sample_again.txt" to a file named "sample_script_copied.txt".
Now press ESC on the keyboard to go back to "normal mode" of vim. Then run the vim command ":wq" to save the script file and quit vim. You may run the "ls" command to verify that the script file is in the working directory.
To execute the script, run:
./myscript.sh
But you'll find this gives you a "Permission denied" error message, as below:

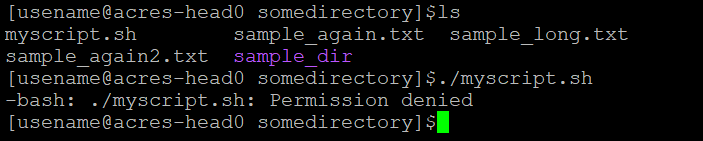
This is due to the concept of Linux file permissions, which was mentioned previously. By default you do not have permission to execute the new script file. To give yourself permission, run the following command:
chmod +x myscript.sh
If you run "ls" now, you will see that the script file is in green, indicating that it is an executable:


Now run the script, and you will see that it successfully copied the file as it was supposed to. "sample_script_copied.txt" has appeared in the working directory.


Not needed to run job scripts
Note that this proceedure to make myscript.sh an executable is not required to run a SLURM job script via "sbatch "
Variables
You may set and / or define variables in the script using the following syntax. Do not put any spaces surrounding the equals sign!
VARIABLE=VALUE
In essence, this creates and/or sets an environment variable. However, if you set a variable like this inside a script, it cannot be used outside the script, unless you use the "export" command, like so:
export VARIABLE=VALUE
Job Scripts: Use "export" !
You need to use to "export" command to set a variable in a SLURM job script if you want your program you are running to have access to that environment variable.
If you want to have spaces in the VALUE, you must put it in quotes:
VARIABLE="value with spaces"
To retrieve variables, surround the name with curly brackets, and put a dollar sign out in front (sometimes the curly brackets are optional, but it is safer to always include them):
${VARIABLE}
The VALUE of the variable will be substituted for "${VARIABLE}" when you execute the script. As an example, we could rewrite myscript like so:

See All Environment Variables
To print out a list of all environment variables and their values, use the "env" command, either from the script or from the command line. If you are looking for a particular environment variable, you may filter the list by using "env|grep ".
Learn more about the grep command and the "|", which is a "pipe" redirect, here: http://www.wayofwebs.com/linux/basic-use-of-pipe-and-grep-command/
Command line arguments
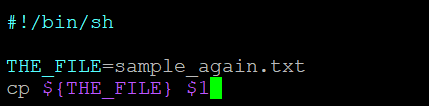
Suppose we want to make our test script more general and let the user set the name of the sample_again.txt copy. To do this we can use special variables that represent the script command-line arguments. The first command-line argument can be retrieved with "$1", the second with "$2", third with "$3", etc.
So let us use vim to modify the script accordingly ("vim myscript.sh", then press "i" to insert):

Save the file and close vim. ( ESC, then ":wq" )
Now we can run the following command to run the script with the argument "new_sample.txt", which copies sample_again.txt to a new file called "new_sample.txt":


Programming functionality
Shell scripting becomes all the more powerful, when you take advantage of programming functionality, like:
Cancelling / Aborting a Command
If you need to cancel or abort a command, press ctrl + c on the keyboard.
Not for SLURM Jobs!
You cannot use Ctrl + c to cancel a SLURM job. A slurm job is begun from the terminal with sbatch, but then it runs on it's own, outside the terminal, so it must be canceled with "scancel ".
Other Useful Commands
grep for searching through files for specific words or text: https://phoenixnap.com/kb/grep-command-linux-unix-examples
find for finding files on the system: https://www.educba.com/linux-find-command/
tar for unpacking / packing "tar" or "tgz" files (which are like zip files): https://phoenixnap.com/kb/tar-command-in-linux
For Further Reading on ACRES
How to run your codes on Acres
How to Build a Submission Script
How to find Software (introduction to the module system)
How to Use Graphical Applications on ACRES
How to Use EasyBuild for Self-Service Software
How to Automatically Retrieve Results / Postprocess When Job is Done