
Move Videos to Echo360 to Save Moodle Server Space
Summary
Course sections in Moodle with videos that have been uploaded directly into the section as opposed to linking out to or embedding from an external source cause the course section to be unusually large which can slow down the Moodle server. OIT recommends that all video be moved to Echo360 and shared with the course either by link or embedded.
This Guide Will Help You to:
- Create a copy of the course with the videos
- Download the videos
- Upload videos into Echo360
Create a copy of the course with the videos
- Create a blank course in Moodle in the following category: Courses -> Miscellaneous -> Instructional Design -> Sandboxes -Clean_Course #_Term_ SB
- From the new course, import in the section that the instructor has chosen for the migration.
Download the videos
- Search through the course and download each video that has been uploaded directly into the Moodle course. Many times it will look like this:

- As you download a video, prepare to remove all copies of the video that may be in the course.
- Important:
Setthis uppoint, ayou newcan sectiondelete inany Echo360
current - .mp4 or other videos formats that are being replaced.
AsFollowantheseadmininstructionsinorEcho360, go toCourses, then clickNew Section.Whencontact theCreate Section box displays:SearchHelpDesk forand select thecourse.assistance.ChooseMiscellaneousfor the term.In the section box, typeM4 Migration.Assign yourself as theinstructorfor the course.ClickSave.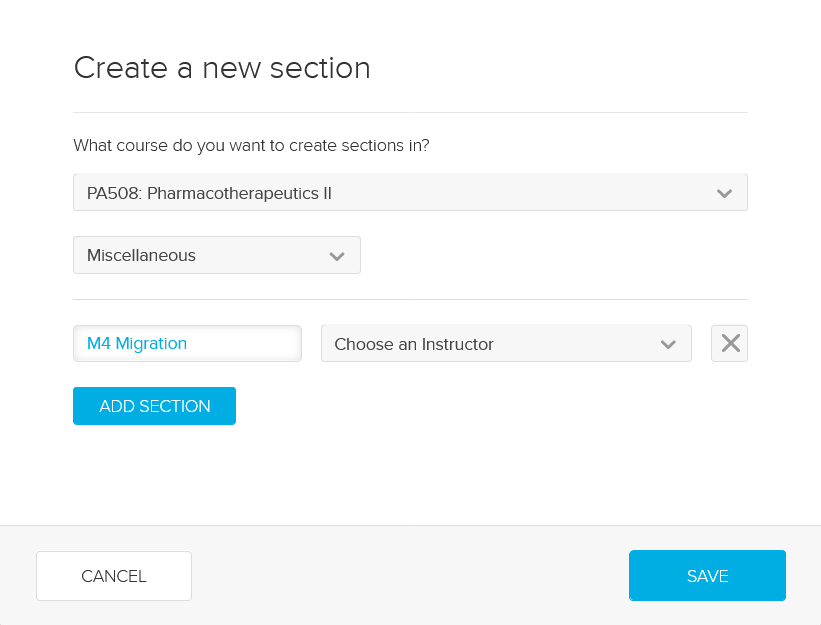

Upload videos into Echo360
For each video that needs to be uploaded: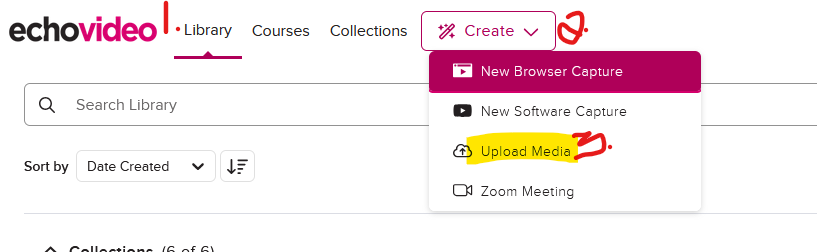
LocateSelect thevideovideo(s)inyouthe Moodle 3 course and copy the title of the video/link.In Echo360, clickNew Class.Paste the title of the video into the Name field.ClickSave.Click the plus signdownloaded tothe right of the video's title and chooseAdd Video.ClickUpload File.Locate the file onyour computer and clickUploadOpen to upload (you can upload one or more at a time by using the Ctrol+ Shift keys).Note:The video will take a few minutes to upload and process, depending on it's size.
Change each video's ownership to the instructor:Click the green play button to the right of the video.SelectDetails.Click theDetailstab.Click the pencil icon to the right of the owner name.Type the name or email of the instructor and clickDone.
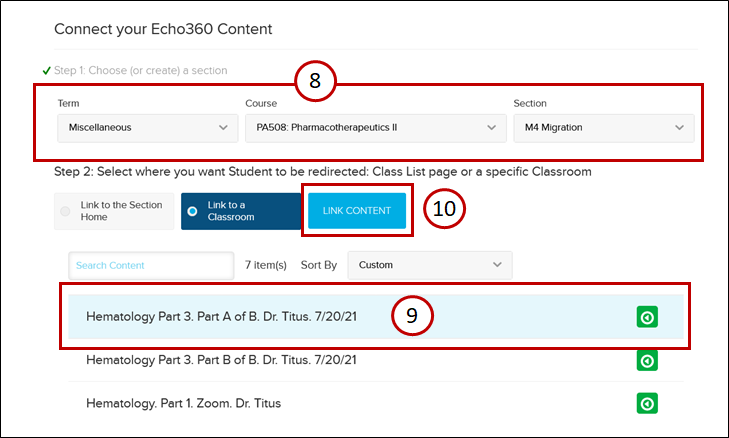
Link the videos from Echo360 into Moodle
You must be enrolled in the Moodle 3 course as a Teacher to complete these steps. When the videos have fully processed in Moodle, for each video that needs to be linked:
Videos can also be embedded from the library, See Bringing Video Embed Code from Echo to Moodle
Seek Further Assistance
For additional assistance please contact, Clarkson OIT Help Desk;
Online: Get Help
Email: helpdesk@clarkson.edu
Call: 315-268-HELP (x4357)