
Manually Mapping A Network Drive In Windows
==========================================================
DISCONNECTING AND REMAPPING SHARED DRIVES IN WINDOWS 11
==========================================================
STEP 1: DISCONNECT EXISTING DRIVES
------------------------------------------------------------
1. Press Windows + E to open File Explorer.
2. Click on the Start Menu and right click on **"This PC **in Windows 10 and click on 'Map a Network Drive'.
2. From the 'Drive' drop down menu choose the drive label that you wish to map. For example, if you are trying to map the S: Drive then choose S:. In the Folder drop down. EnterPC" in the pathleft ofsidebar.
3. the drive that you wish to map. ForRight-click the S: drive typeand select "Disconnect".
4. Right-click the U: drive and select "Disconnect".
Note: If either drive is not currently mapped, skip it and continue to Step 2.
STEP 2: REMAP THE S: DRIVE
------------------------------------------------------------
1. In File Explorer, click "This PC" in the left sidebar.
2. Click the three dots (...) in the top menu bar and select "Map network drive".
3. Set Drive to S:
4. In the Folder field, copy and paste the following:
\\ad.clarkson.edu\shares\dataShares\Data\departments
5. thenCheck the box for "Reconnect at sign-in".
6. Click Finish.
STEP 3: REMAP THE U: DRIVE
------------------------------------------------------------
1. In File Explorer, click Browse."This YouPC" can then navigate throughin the pathleft sidebar.
2. Click the three dots (...) in the top menu bar and select "Map network drive".
3. Set Drive to theU:
4. folder you need access to and it will populateIn the restFolder field, enter ONE of the **Folder:following depending on your role:
For Students:
\\ad.clarkson.edu\Shares\Student Home Directory\USERNAME
For Employees:
\\ad.clarkson.edu\Shares\Employee Home Directory\USERNAME
**field.* Replace MakeUSERNAME surewith thatthe actual Clarkson username (e.g., smithj) ***
5. Check the box for "Reconnect'Reconnect at logonsign-in".
6. isClick checkedFinish.
7. and click 'Finish'.

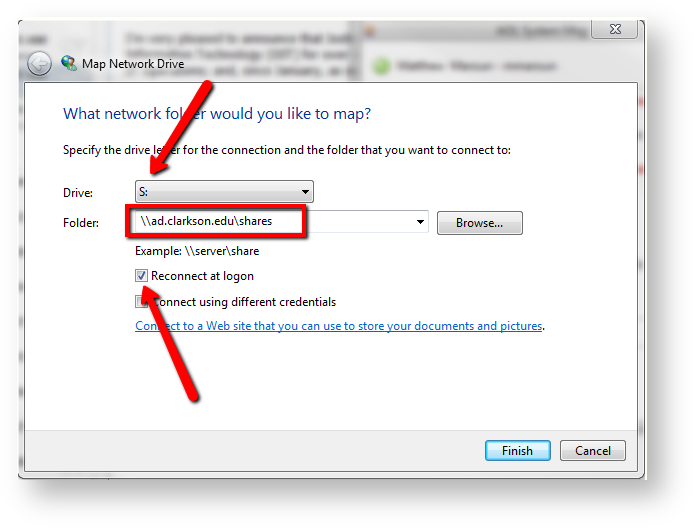
If prompted for yourcredentials, username enter as **AD\username
3. To manually maphave the user authenticate.
VERIFY
------------------------------------------------------------
Once complete, both S: and U: drive,should Selectappear U:under "This PC" in File Explorer.
IMPORTANT: You must be connected to the dropClarkson downnetwork as(on-campus shownor abovevia VPN) for these drives to connect.
TROUBLESHOOTING
------------------------------------------------------------
- "The network path was not found"
Make sure you are connected to the Clarkson network or VPN. Verify the path is typed correctly with no extra spaces.
- "The local device name is already in use"
The drive letter is still in use. Go back to Step 1 and intdisconnect it first, then try again.
- "Access is denied"
Verify your credentials. Try checking the Folderbox fieldfor enter,"Connect \\ad.clarkson.edu\Employeeusing Homedifferent Directory\usernamecredentials" wherewhen **usernamemapping.
- **isDrive disappears after restart
Make sure "Reconnect at sign-in" was checked when mapping the person's AD username.drive.
==========================================================